Showing posts with label customization. Show all posts

Monday, June 27, 2022

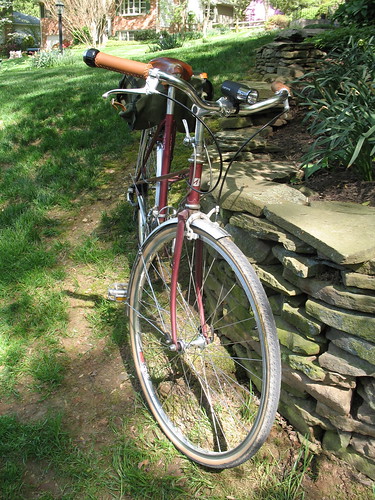
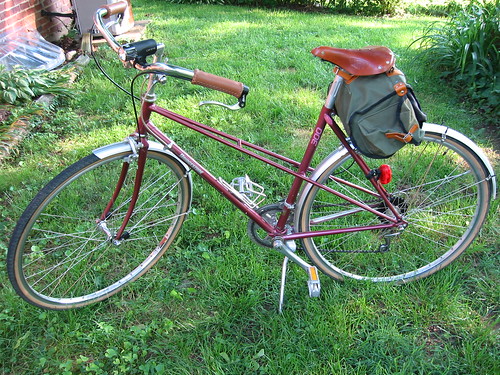
My "new" 1977 Mondia Super "gravel" bike.

 A few years back, my pal Shawn surprised me by shipping me this lovely Swiss Mondia road bike frame for my birthday.  It hung on a hook in the shop for a couple of years, while I pondered how best to build it up.  Finally, after riding my fully equipped Goshawk touring bike on the C&O Canal and Great Allegheny Passage for years, I realized the Mondia might make for a fun, lighter option for those unpaved trails.

Originally intended to be a sporty/racy road bike, the frame is built from the well known Reynolds 531 double-butted manganese-molybdenum tubing, with the very pretty Nervex Professional lugs at the joints. Intended for 700C road wheels and tires, it would probably fit around a 25 or 28mm wide tire, which wouldn't be ideal for the kind of riding I wanted to do on this bike.

On the other hand, over the last 15 years or so (how time flies!), the bike world has seen the resurgence of a tire/wheel size that many had considered obsolete - 650B.  Wait, what the heck is all this "700C" and "650B" stuff anyway?  Well, both of those are tire/rim size labels that come from the French cycling industry.  In the original scheme of things, the number (700 or 650) indicated the nominal outside diameter of the tire in millimeters.  The letter was used to indicate whether the tire was narrow or wide, with A being the narrowest, D being the widest.  As with so many things in the bike industry, how things started out is not where we are today, and a typical 650B tire is much, much wider than a typical 650C tire is today, and 700C tires range from 23mm to 50mm or wider, while 700A, B, and D have vanished as labels. Confused?  Welcome to bicycle tire size "standards" which are anything but standard.  Some good info can be found here:  https://www.sheldonbrown.com/tire-sizing.html#french

Okay, what does this mean for my Mondia?  Well, 650B tires and wheels are smaller in diameter than 700C by 38mm.  Mounting a set of those on a frame designed for 700C wheels gives you room for wider/taller tires, which give more cushion on rough surfaces.  In the case of this Mondia, I was able to easily fit 40mm wide tires on a bike that normally would have only allowed for 28mm or so.  I even had room for a set of fenders to boot!  I had a set of 650B wheels I'd built some some time ago, with older parts, Sansin hubs and Alesa rims with Panasonic Col de la Vie tires.  I'd thought about using them on a couple of other projects, but it wasn't until the Mondia that it came together.

The rest of the parts are things I've used on a number of other builds, because they just work for me.  Sugino Mighty Tour crank with 40 and 52 tooth chainrings, MKS Touring pedals, SunTour 14-30 freewheel, SunTour VX derailleurs and Power Ratchet bar end shifters, Nitto bar and stem, and of course a Brooks B17 saddle.  The brakes are long reach Weinmann centerpulls, which work great.  Accessories at this point include SKS Longboard fenders, a Velo Orange Randonneur front rack and handlebar bag, and Carradice Lowsaddle Longflap saddlebag.


 More photos can be seen here:  1977? Mondia Super


Monday, January 3, 2011

Winter is for Project Bikes!

Well, I as have written in the bikes@vienna blog, now is the perfect time of year to tackle a project bike. And that's just what I'm doing!

Follow along as my girlfriend and I put together her next bike. Our starting point is this:


A Velo Orange Mixte frameset. She and I both have a fondness for this style of frame, and the Velo Orange version is really lovely. Fully lugged steel construction, classic styling, and a pretty blue paint job. I presented the frame and fork, still in the original shipping box, fully gift wrapped, at Christmas. I was certain she'd figure out what it was... in fact, I asked one of my staff, after I wrapped it "If you were to get something like this from someone you knew was a bike person, would you guess it was a bike?" and he laughed and said of course!

Well, imagine my surprise when my girlfriend had no clue, even as she peeled the gift wrap off and saw the box and Velo Orange label. I guess it was just not on her radar, because after the fact she said she thought MAYBE it was a set of fenders or something, but never dreamed it was a frame. Anyway, a great surprise, and she's very excited to start the process of picking parts and accessories and building it up with me.

As an amusing sidebar, we just discovered this blog post from another DC-area bike blog, in which the writer documents the unpacking of the very same frame in a very humorous "for me?" format. Of course, since it appears she bought it for herself, there's not the element of true surprise, but it's fun reading. And a really interesting blog all around.

So what's the plan? Well, it's still taking form, but at the moment, we're aiming for a bike to use for shopping, commuting, riding around town, and maybe a little touring. And it's got to be stylish to boot! We've been poking around online looking at other people's bikes, as well as various parts and accessory suppliers' websites, and bouncing around ideas. So far it's looking like we're going with a Shimano Nexus 8 speed internally geared hub, and probably some flavor of Shimano dynamo hub on the front.

Watch this space for future developments!


Monday, June 8, 2009

Making Your Bike YOURS Pt 3 (Mixte Makeover)

It's been a while since I've visited the topic of customizing your bike to suit you, but here's a project I've been involved with for a while that I just had to write about.

Back in the fall, thanks to this blog, I was contacted by a woman looking for a "mixte" style bicycle. Historically, a mixte was intended as a sort of "unisex" frame that would work for either men or women. The traditional design uses two thin tubes angling from the top of the head tube (where the steering bearings are) all the way to the rear dropouts which hold the rear axle. As I recall, the French first popularized the design, but just about every maker of bikes in the days of the old "ten speed" made some variation on the mixte concept. I've always really admired the design, and heck, here was a person looking for a classic steel bike, so I jumped at the chance to help.

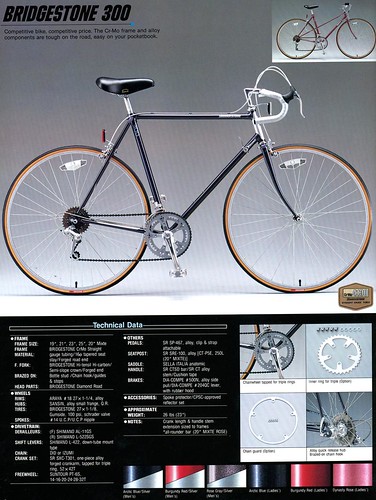
Anyway, in short order, through luck and the help of a friend of mine who apparently spends entirely too much time looking at Craig's List, a mixte was found - a very nice 1986 Bridgestone 300, in a pretty rose color. Then the fun began. The owner brought the bike in for me to look at and assess, and give her some suggestions on fitting and accessorizing. Thus began a process that over the next few months transformed the bike into just the right bike for her... or at least we're well on the way to that!


The first order of business after determining that the bike was in fine mechanical shape, was to try to set the bike up to fit comfortably. In the simplest sense, that wasn't so hard... but "dialing in" the rider's position took a fair amount of time and several different attempts with handlebars. However, that's just the sort of project I enjoy, so it worked out fine, and the owner and I have become friends over the course of this project as well.


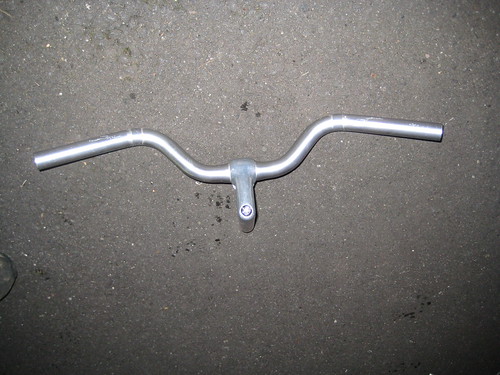
Originally, the bike came with what used to be known as "French style" handlebars, shown in the photo to the right, and in the inset above on the catalog page. It's hard to tell without the bike as a frame of reference (I didn't think to snap a photo before taking them off, dang it!), but they are a narrow, upright style of bar, which sweep forward from the stem, then angle slightly back to the grips. The rider's comments were that they felt narrow and low and too close in. Or at least, that was my interpretation. Sometimes it feels like you're speaking different languages while trying to sort out bike fit and feel!


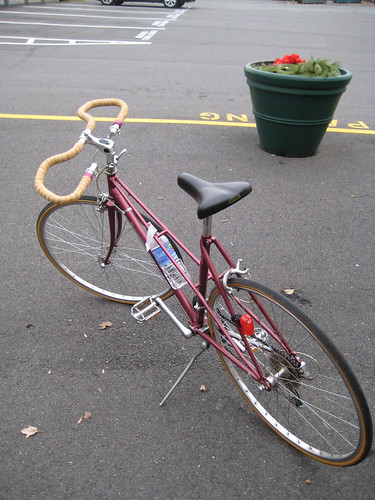
So the first thing we tried was a set of "trekking" or "butterfly" bars. These are a design that you don't see much in the US yet, but they are apparently popular in Europe, for touring as well as commuting. They give you multiple positions for your hands, like traditional road "drop" bars, but tend to put in you a more upright and comfortable position. You can see them wrapped in natural cork tape here on the bike... which in itself led to a pursuit of the perfect color of bar tape for a while! Some mechanics might have found that silly, but having agonized myself over such things, I understood. In this case, there was much anguish over the right color to both complement the honey Brooks saddle (um, yes, another sign of my influence... and no, I don't get a kickback from Brooks!), as well as the rose color of the bike itself. The owner went through a seemingly endless array of options, including several shades of tape (tan, maroon, green...) and even a lovely brown leather sewn-on wrap. Ironically, all the agony over bar wrap ultimately proved irrelevant, as you'll soon see.

Anyway, after riding with these bars for a while, the verdict was that while they were pretty comfortable and versatile, it wasn't a perfect fit, and they just "didn't look right" on the classic steel bike. There's always a balance to be found between form and function in most things, and bikes are no exception. Another person might have decided otherwise, but the owner really wanted a bar more in keeping with the aesthetics of the bike, while offering a comfortable riding position. She's a graphic designer, so the visual makes a big difference, and from my years of working with scenic designers, I knew not to argue.


Next up, we tried Nitto "moustache" bars, a personal favorite of mine. I like the look and feel of them, and find them really nice for a general purpose, knocking around kind of bike. Not as racy as drop bars, but more hand positions than a straight bar. And they look more in keeping with an older bike, I think. The problem here was they just never really felt comfortable for the rider, despite tweaking the position several times both vertically and horizontally. Honestly, I wasn't that suprised, as I know that moustache bars just don't work for some folk, particularly women. There's just something about the position they put you in that just doesn't agree with some. I should note, by the way, that here is where an "adjustable" stem comes in handy. Unlike more traditional rigid stems, this type is articulated such that you can adjust the angle and thus the reach as well as the height. Not the prettiest stems, but very practical when working out fit issues.


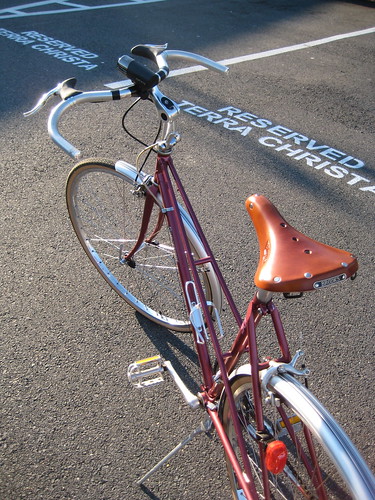
Finally, or at least to date (stay posted!), what we settled on is a traditional "North Road" style of bar, similar to what millions of classic old British three speeds used. In this case, it's a very nice, simple, affordable bar from Wald, one of the few US makers of bike parts that has been around a long, long time. They've been making baskets, bars, stems and other bits and pieces in Kentucky for ages now. And one ride with their model 8095 "touring" bar convinced the owner that these were the best choice so far. Pal Beth, of the bikelovejones blog, will appreciate this, as they are a favorite bar of hers. A little tweaking here and there, and it seems we've hit upon a winner. You can see the bike here in the penultimate setup, with the adjustable stem and original brake levers.

Speaking of brake levers, in an earlier experiment, I let my friend try out my Dahon Hon Solo, which has moustache bars and "reverse" brake levers, which plug into the end of the bars and point forward. She liked those right away, so along with selecting a more attractive, rigid stem based on the setup we had settled on with the adjustable, they completed the package. Well, completed it as far as riding position goes...

You see, there's more to making a bike "yours" than simply position. Based on some of my suggestions, this mixte is taking shape in other ways as well. You have probably noticed by now that in the later photos the bike now sports several features that clearly show my influence... notably the Brooks saddle, Carradice Pendle bag, and SKS fenders. What can I say? I know what I like, what works for me, and I will steer folks that way if I think it's the best choice for them. There are plenty of people that have come to me to ask my advice that I would never dream of putting on a Brooks or suggesting a Carradice, but when someone notices what I have done with my bikes, and asks about it, I know they are open to the idea. A starting point on this whole project was the owner taking a look at my bikes and getting a feel for the style I prefer, and she seemed to really "get" it. And so far, the saddle, bag, and fenders all seem to be working for her. Although she has been eyeing some Velo Orange fenders lately...

But there's more to be done still... with a desire to use the bike for transportation... shopping, errands, commuting... the question of luggage is still being explored. The Pendle bag is a great bag for a recreational day ride, with room for a lunch, patch kit, tools, and a few extra bits of clothes... but it's not really enough to tote groceries home, or a change of clothes for work. For that we're going to be looking into a rack and some bags of some sort, perhaps "grocery panniers" a simplified design of bag that hangs on either side of a rear rack. Or maybe soemthing in a stylish basket? A set of Basil bags, in their fun colors and designs? Hmmmm.... So many choices, so many fun options!

Stay tuned for future developments, and other "makeover" projects as they come along.

There she is, in all her glory!


A few more photos can be seen at:
http://www.flickr.com/photos/43828356@N00/sets/72157618985717292/

Thursday, January 1, 2009

Paramount Update

Well, those of you that have been following my blog for a while, or have discovered it recently and went poking around the archives, know that about a year and a half ago I bought a '73 Schwinn Paramount from a friend of mine. If you didn't know that, see the posts below: http://spokesofawheel.blogspot.com/2007/08/my-new-bike.html http://spokesofawheel.blogspot.com/2008/01/newold-front-derailleur.html The Paramount was Schwinn's top of the line, hand built bike, made in both touring and racing models. Mine's the P15-9 tourer, and I love it. When I bought it, most of the parts were completely original. I changed a couple of things... a longer stem, new cables and housing, new tires, and "clipless" pedals for most of my riding. The last item is the only one that's just plain "wrong" period-wise, but since I do much of my riding in SPD style sandals, it's an anachronism I'm willing to live with. And if I ever feel the urge to be more "correct", I have a set of old Campagnolo track style pedals with toe clips and straps that will be just dandy for that, and work with my big feet. The original "quill" pedals don't make my size 13s happy, unfortunately, and besides, they are pretty beat up. Anyway, I have since made a few other changes to the bike, but have managed to stay with period parts. First, as noted in an earlier post, I replaced the "wrong" front derailleur it had with the proper Campy piece. Second, I replaced the two outer chain rings with slightly smaller ones... the originals were 36 teeth, 49 teeth and 54 teeth, and honestly, that gave me higher gears than I needed. Now it's set up with 36/47/52, and I'm a lot happier... with the (original) 14-31 five speed cluster in back, I have a pretty useful range of gears, and it's interesting to have a "half step" drive train again (http://sheldonbrown.com/gear-theory.html#halfstep). Most recently, I've added fenders to the bike, as shown in the photo to the left. I looked at and considered a variety of fenders, including some of the lovely Honjo alloy fenders that look very similar to older French fenders of the same period as the bike. In the end though, based on the advice of a trusted advisor, I opted for a set of black Bluemels Club Special fenders, which are actually a model made in the early 70s, so they are truly "correct" for the bike. I bought a New Old Stock (NOS) set of them on ebay a while back, and I have to admit, they look sharp. I had hoped to track down some red ones, but those are pretty rare these days, and the black might actually be a better choice, now that I see them on the bike. Most Americans eschew fenders, but I'm a big fan, as I have noted in previous posts. Finally, I hung a NOS Schwinn Touring Saddlebag from the Brooks B.17 saddle. I bought the bag from someone on the Classic Rendezvous mailing list (http://www.bikelist.org/mailman/listinfo/classicrendezvous), a fascinating group of folks that know a heck of a lot about older, classic bikes. The bag was made in England for Schwinn, by a company named Karrimor... sadly long gone, but I was lucky enough to find this one. Similar excellent bags are still made by another British firm by the name of Carradice (http://www.carradice.co.uk/index.html), but it's nice to have the original Schwinn bag. I also installed a small metal saddlebag support on the seat stays... you can just make it out in the photo to the right, the little silver wire under the bag. I don't recall the maker... something like Midland or something, another English company of that era. It helps to keep the bag from dragging on the tire, or resting on the fender, when fully loaded. All in all I think the bike looks more "complete" with the bag and fenders... ready to go on a real ride in the real world, which is what these touring Paramounts were designed and built for. I still haven't decided whether or not to make the leap to getting reproduction decals, and whether or not I feel brave enough to apply them myself, but I suspect that one day I'll do that, or have them done by a pro.

Check out photos of the bike here:  '73 Paramount P15-9

Wednesday, December 17, 2008

Making Your Bike YOURS (part 2)

Well, let's start by using my own 1985 Miyata 210 as an example of what I have started talking about in the previous post. To begin with, a little about the bike... I picked it up used, a few years ago, with the intent of making it over into an all-weather commuting bike. It began life as a low-end touring bike, with similar design but less expensive parts than my Miyata 1000 (which is a story in and of itself, for another day). I neglected to get photos of it when I first bought it, but here's a clipping from the 1985 Miyata catalog:

As the catalog indicates, it was designed as a "budget" touring bike. Long wheelbase, clearance for wide tires, fittings for racks, etc. All of which also made it a great candidate for a commuter, although I knew there were things I was going to want to change.

First off, I decided drop handlebars were not what I wanted for this bike. For commuting purposes, I wanted a bit more upright posture, both for comfort and for ease of looking around in traffic. So I opted for a set of Nitto "Albatross" bars, a variation on the old classic three speed bars, with more sweep back. To go with the more upright posture, I decided on a Brooks B.67 saddle... wider than my B.17s and with springs for comfort. Next, because I ride at night as well as in daylight, I built a wheel around a Shimano Nexus dynohub and installed a Basta halogen head light and simple tail light run from the hub. In addition, I like to have redundancy in a lighting system for a transportation bike, so I installed a battery powered head and tail light as backups. Fenders were a necessity, to allow riding in all weather. In the photo you'll also notice perhaps that I had installed studded tires for winter use, figuring I'd swap them out for conventional tires in spring. Finally, since I wasn't planning extended rides over varied terrain, I wanted to simplify the drivetrain, so I went with two chain rings instead of three, with seven sprockets in the rear.

I rode the bike in this configuration for most of the first winter I had it. But a few things just didn't work for me... notably the handlebars. I found that the very upright position was less than ideal on my 6 mile ride into work, which often featured a headwind. I tried lowering the bars a bit, but it only helped a little. A bigger issue was that I found the front end of the bike felt a little too "light"... which proved a bigger problem on ice and snow. It became obvious to me that I needed bars that put more of my weight over the front wheel, so I went back to an option I'd used previously on a couple of bikes and liked... the Nitto "Moustache" bar. This gave me a wider range of possible hand positions and had the benefit of letting get a bit more weight over the front wheel AND be more aerodynamic. I quickly found I liked the bike a lot more this way.

Over time, I made a few more refinements to the bike that have helped make it a better, more utilitarian transportation bike. The biggest change was in the drive train. If you look closely at the photo to the right, you'll see that I've installed a Shimano Nexus 8 speed internally geared hub. Unlike a derailleur system, the internal hub has all of the major moving parts completely enclosed and protected from the elements. In addition, you can change gears while standing still, which is nice when you're riding in traffic. If you remember the old English three speeds, this is basically a more modern version of that with more gears. Eight is honestly plenty for a utility bike like this. I kept the double chain ring setup, with 34 and 38 tooth chain rings, figuring I'd use the lower range in winter with the studs and higher with lighter tires in spring, summer and fall. Honestly though, I never went to the trouble to reposition the chain when the seasons changed.

Other changes you'll note... a narrower saddle to go with the more forward-leaning position of the moustache bars... a better quality headlight... and most importantly, baskets front and rear. While panniers can work for shopping, it's much handier to just have baskets permanently mounted. The front is a basic Wald wire basket, mounted on a cheap front "mini rack" from Bike Nashbar, and the rear is the classic Wald folding grocery baskets, sized to take a standard paper grocery bag, and tucking out of the way when not needed. Those are attached to the classic Blackburn rack, one of the great workhorses in bike racks. A final detail is the Pletscher two-leg kickstand... heavy, but gosh it's nice to have when you have a load of groceries.

Oh, one more thing to note... in both pictures of my bike you can see several stickers plastered here and there. I tend to do that with my "utility" bikes.... it makes them uniquely mine, and perhaps less appealing to thieves. No idea if that last part works, but it can't hurt. And it's an opportunity to express some opinions, such as "If you were riding you'd be happy by now" and " Books and bikes undermine the aspirations of dictators". You'll also notice a fair number of pieces of reflective silver tape strategically placed around the bike, to help make me more visible at night. Kind of ugly, but it's a safety thing.

So that's one example... more to come. And not just my bikes, I promise!

Saturday, December 13, 2008

Making Your Bike YOURS

One of the things I love about working on bicycles, both my own and others', is setting the bike up so it best suits the rider and the use they intend for the bike. I think most folks assume that the way the bike comes from the factory or the bike shop is the way it's meant to be, and never think of changing it. On the contrary, any bike can be modified, and in many cases should be, in order to really become "yours".

First off, what do I mean by "yours"? Well, a bike you own should first of all fit your body. Bikes are typically designed for the "average" person, in most cases, the average man. Since few of us are in fact, average, and 51% aren't men, the first thing I recommend to folks is that we figure out how to make their bike fit them better. This may simply involve adjusting the height and angle of the saddle and handlebars, as well as the fore and aft position of the saddle, or it may involve changing the saddle, bars, or stem (the part the bars attach to). In some cases, all of the above!

I'd have to say, the most common fit complaint I have from customers boils down to the handlebars being either too low or too far from the saddle. This sometimes manifests itself as a slight discomfort, but in more severe cases can cause acute pain or numbness in the hands, wrists, arms, neck or shoulders. Most people don't spend a lot of time supporting a lot of weight on their arms, so low and far handlebars can be quite uncomfortable. Granted, there is some degree of "getting accustomed" involved, and the more you ride, the more comfortable lower bars can feel. But for most people, the answer is to raise them or get them closer or both. This can be accomplished with a different stem, perhaps, or even different handlebars. Visit your local shop and talk about the possibilities.

The next most common comfort issue (and it's nearly a tie here) is the saddle. I'll start right off saying I can't tell you for certain what saddle is going to be best for you. That's a very personal part of one's anatomy, and we're all different, so what works for me may not work for you. In fact, many people, in looking at my bikes with their Brooks tensioned leather saddles, think I must be some sort of masochist. Far from it... I have found over the years that for my behind, and my style of riding, nothing is more comfortable than the Brooks B.17 saddle. But that's me. You are different. The best advice I can give you is to talk to your local shop and get their feedback. One thing to think about is the shape and softness of your current saddle, and how it feels beneath you. Does it feel so narrow that it threatens to split you in two? Or is it so wide your thighs rub excessively? See why saddles are hard for folks to talk about? :-) Seriously though, think about the sensations you feel on your current saddle and then compare the shape and softness to other saddles to find what works for you. It may take several attempts... but don't give up until you have something that works for you.

Now beyond basic positioning issues, you can customize your bike for your needs in other ways. You may not realize it, but your bike's gearing is not set in stone. Do you feel you struggle to grind up steep hills, feeling like you're pedaling in concrete? Or does it feel like you end up with your feet flailing at a crazy high speed and your highest gear is too easy for you? Either extreme is pretty simple to adjust, although depending on the components on your bike, it can get expensive. But if you aren't enjoying the ride, you won't ride the bike, and what's the good in that? Again, talk to the folks at your local shop and see what they can do for you.

Another change to consider is your tires. Many bikes come from the factory with pretty generic, utiliatarian tires that provide a decent ride at a modest price to the manufacturer. Given the enormous selection of brands, models, sizes and styles of tires available today, there's a good chance that there's something better for the type of riding you do. Do you ride mostly on smooth, good roads and bike paths? Go for a lighter, faster-rolling tire. Commute on rough, glass strewn city streets, and can't afford to be late for work due to a flat? Go for the rugged, wide, kevlar belted models. Ocassional jaunts off road, in dirt? There are tires for that too. Try to find someone who does the kind of riding you do, and ask their advice. Experienced riders will have pretty strong opinions, and as long as their priorities match yours, you should get good advice.

Now, beyond all of these central matters, there are other ways to truly make your bike suit you and your riding. If you're like me, and don't want weather to keep you off the bike, you should give serious thought to fenders... they will greatly increase your comfort and cleanliness (and your bike's) in the rain. Any chance you'll be caught out after dark? Then invest in at least a basic front and rear light. I'm a big fan of the small, self contained headlights from Planet Bike, and blinky red tail lights from PB or Cateye, but there are plenty of other options. For bikes used on a more regular basis for transportation, I really like the dynamo hub systems from Shimano or Schmidt, which free you of worries about batteries. Don't forget a bell, if you regularly ride multi use trails... walkers, joggers, rollerbladers and the like seem to respond well to a "ding ding" rather than a shout.

Then there are the items that just make a statement, or simply personalize your bike so it "looks right" to you. Perhaps it's a matter of getting just the right color of bar tape on a road bike (I have been known to agonize excessively over this!), or an assortment of stickers that express your world view ("If you were riding you'd be happy now" is a personal favorite of mine). Or maybe it's something whimsical... for example, my "fixed gear" bike (a type of bike known to have some very "serious" fans) has a colorful, parrot shaped squeeze horn! These are the things that often come over time, as you and your bike become acquainted, and you slowly shape it and make it yours.

So don't be afraid to change the way the factory built it! There's nothing sacred, and as long as you know a bit of what you're doing, or know someone (like your local shop mechanic) who does, you can't do much harm. Start with the fit issues and go from there, and soon you'll have a bike that's like no other, and suits you to a "T".

(Look for a future post with specific examples... but for now, take a look at the two photos here. Both are of my '85 Miyata 210 that I built up for commuting and shopping... the first photo is how I initially set it up, the second is how she is now... see if you can spot the changes!)

Tuesday, November 25, 2008

Yet Another Bridgestone!

Well, here's another bike I've built up from a frame that was gathering dust and parts that were doing the same! And yes, it's another Bridgestone! This one is an RB-2, from 1992, the second from the top-of-the-line road model from them. None of the parts are what the bike originally would have had, but I wasn't trying for a "correct" restoration, but rather wanted a light, zippy road bike with parts I had on hand. Cranks are an older Shimano XT, set up as a double chain ring instead of a triple. Derailleurs are older Shimano Ultegra, and shifters are the Shimano barcons so many of my bikes seem to have these days. Brakes are a pair of short reach Royal Gran Compes from sometime in the 80s, I think, with lovely script lettering on them. Bars and stem are Nitto, again a personal favorite. Right now the saddle is the original Avocet Racing saddle, but you guessed it, I'll probably put a Brooks on there soon.

I've only had a chance to take a short spin around the parking lot, but it feels good so far. The top tube is a little longer than a lot of my bikes, as is the stem, so we'll see how I like a more stretched out position. Part of the point of this build was to try that out, so this should be interesting to see.

Oh, and I predict the white bar tape will be swapped for something darker, like, say, black, before too long. But gosh it looks pretty with the white!

Sunday, November 9, 2008

My "New" Bridgestone RB-T

Another "project bike" hits the road finally!

I picked up this frameset longer ago than I care to admit, and it's been hanging in the attic for too long. It came my way when I casually mentioned on the Bridgestone Owner's Bunch internet list that I would someday like to own an RB-T, if I could find one in my size. Next thing I know, I have a guy emailing me and telling me he's got one he'd like to sell. That's actually the same way I got my Bridgestone XO-2. The BOB list is an amazing bunch of bike nuts.

The RB-T was a early 90s bike, Bridgestone's version of a light touring bike. Not a full on "load up all your camping gear and strike out across the US" bike like my Miyata 1000. Sure, you could use it that way, but it's not as "hardcore loaded touring" as that. Bridgestone described it in their 1994 catalog, which you can find here:

http://www.sheldonbrown.com/bridgestone/1994/pages/47.htm

Since I got it as just a frameset, none of the parts are as described in the catalog. Rather, I put together a combination of parts I had on hand to create a bike I could use for commuting and casual fun rides on pavement as well as mild off road riding. Nothing too hard core... canal towpaths, dirt roads, that sort of thing.

To start with, I wanted to put moustache bars on the bike. I've had them on a couple of other bikes over the years, and in general have really liked them for the kind of riding I mentioned above. Also, based on past experience with an old Fuji road bike, I wanted to add "stoker" levers in addition to the real brake levers. You can see them in the pictures... they give you a nice comfy hand position near the stem, which is otherwise lacking on moustache bars,as well as giving you a large flat expanse to rest your palms across the stoker levers, bars, and brake levers. The rest of the parts are an eclectic mix of mostly 90s parts... Deore DX crankset, XT rear derailleur, RX100 front. The hubs are more modern Deores from the early 2000s, with Sun CR-18 rims, one of my favorites. Strong, reasonably light, and easy on the eyes. The saddle is my all time favorite, the Brooks B-17, with a Carradice Nelson saddlebag to carry my stuff. I also opted to put one of my Shimano dynohub-based wheels and a Busch & Mueller DLumotec Oval LED headlight, since I plan on using this bike for a lot of my commuting. Finally, like most of my bikes, this one is set up with fenders... SKS P45 Chromoplastics to be precise. I'm a big fan of fenders, as they vastly increase the usability of a bicycle. It's all about versatility.

Yes, some of you are no doubt saying "geez, can you say 'Grant Peterson acolyte'?" It's true, I've been a fan of Grant's views on bikes for a long while, and some of my choices were no doubt influenced by him. The moustache bars and saddlebag, definitely. But I've always been a fan of Brooks saddles, and have also always preferred classic, lugged steel bikes over aluminum, carbon, etc. And I've long leaned toward the practical niceties in bikes... such as fenders and having some way of carrying things, even if it's just a simple rear rack.


Anyway, I've only done a few short rides, mostly test rides and errands, but so far I really like the bike. It feels light and zippy, but I suspect it will handle moderate loads well too. And the frame has enough clearance for fairly big tires... I can get 32mm tires under fenders on there, which is plenty big for the riding I want to do on it. All in all, a great bike!

Thursday, June 12, 2008

Mixte Makeover

Once again I am lucky to have a bike project come my way that's a lot of fun. And this one isn't even that tough a job.

A woman brought this Lotus mixte-framed bike to our shop for a tune up a few months ago. Then, over this past weekend, she returned, with a new-to-her Brooks saddle and a request for new handlebars for a more upright and comfortable position. A very sensible request, as I think most casual recreational riders aren't all that well served by the typical drop style road handlebars. And it was actually pretty common for mixtes to be equipped with such bars. Many French bikes of the 70s were offered in two versions: diamond ("man's") frame with drop bars and mixte with upright bars.

The word mixte, as I understand it, was originally applied to bikes like the one above... in place of the standard top tube of a diamond frame, two thinner diameter tubes were run from the head tube, passing to either side of the seat tube, then terminating at the rear dropouts. The idea was to provide the ease of mounting and extra room to allow riding in a skirt (or a kilt?), while not compromising away all the rigidity normally provided by the top tube. As I recall, an attempt was made to market them as "unisex" bikes, but that never really took hold in the US, and mixtes more or less vanished from the scene, until making a bit of a comeback, in several variations, recently.

But back to the bike at hand... I took off the drop handlebars and brake levers, and installed some classic "North Road" style bars from Wald, a US company in Kentucky that has been around since 1905, apparently. They are probably best known for their baskets, like the ones on my Miyata 210, featured in earlier posts, but they also make some nice handlebars. Nothing fancy, just well made and practical. (http://www.waldsports.com/) With the bars, I also installed a set of Tektro 819 brake levers, a nice affordable lever for upright bars. All the bike needs now is the leather hand grips to match the brown saddle, and the transformation will be complete. A very pretty and practical ride. (Well, ok, truth be told, if it were mine, I'd also put on fenders and a rack and/or baskets, but...)

Wednesday, March 5, 2008

In Praise of Fenders (aka Mudguards)!

Okay, so since I seem to be lacking in energy for new posts, I'm "borrowing" one I posted to the blog for my employer, Bikes@Vienna:

If you come by our shop, most days you'll see one of my bikes sitting out front, since I ride in most of the time. Folks that know me and know my bikes can pick them out by a couple of key features, one of which is the fact that most of my bikes have fenders on them. In this region, that sets my bikes apart from the vast majority of bikes, since folks here generally shy away from fenders. So why do I buck the prevailing style? It's not simply curmudgeonly behavior... there's a practical reason.

Take a look at my Bridgestone to the left there. Look closely at the tires and the inside of the fender and especially the black mudflap at the bottom. Notice the plethora of mud caked on the tire on the inside of the fender/mudflap? That's the accumulated goo from two recent rides on the C&O Canal after rainfall. What you don't see is any appreciable gunk on the rest of the bike, or on me, after the ride. In marked contrast, on both rides I saw a number of other folk riding bikes without fenders who had amazing mud streaks up their backs.

Aside from the forays on the towpath, one of the things I enjoy about having fenders on most of my bikes is that I never have to think about whether or not it's going to rain... I'm always prepared. It makes my bikes ready to go any time, any place... in other words, versatile. And honestly, they don't add significant weight or air resistance or anything like that. Sure, you probably wouldn't put them on a high end carbon racing bike (you probably can't fit them anyway), but on many other bikes they are a great feature.

I used to think in terms of having a "rain bike"... now I suppose I have a couple of "sun bikes"... the few without fenders that I only ride when I'm reasonably sure the weather is clear, while most of my bikes are fendered. It just makes it easier to have fun on my bikes. So give some thought to adding them to your bike... I don't think you'll regret it, and you may very well find it helps you get out on your bike more often, and that's always good!

Tuesday, November 6, 2007

An old "friend"...

Today I began to work on an old "friend"... the mid 80s Fuji Allegro you see to the left. I got the frame in 1999, back when I was living in Flagstaff, AZ, with the intention of building it up as a "fixed gear". For those of you who don't know, a fixed gear bicycle has only one sprocket on the back wheel, and that sprocket is directly attached to the wheel with no device for coasting included. Which means that if the wheel is going around, so are your feet. Period. It takes a little getting used to, but it's a lot of fun, and is sort of a fad nowadays. I'd like to say I was on the leading edge of the fad, but no. I didn't get it set up as a "fixie" until sometime in 2000, when I was living in Portland. And while it was a blast to ride that way, just before moving back east I changed it back into a multi-speed bike with the ability to coast, as I knew it was going to be my primary transportation to and from work here.

About two years ago, as part of the process of trying to keep my bike collection in check (it didn't work, by the way), I gave the bike to my best friend of many years. He had been using an old mountain bike for commuting, and while I had decked it out for that for him a few years previously, it never really fit him right, and never really rode great. So I let him try the Fuji and he liked it, so it's now his. And recently he brought it to me for a tuneup and new tires, so I get to work on it again. Kind of like seeing an old friend. I'm looking forward to doing the work, and to riding it again. If you look closely, it is festooned with a wide array of stickers, from bike advocacy slogans ("One Less Car", etc) to a daisy on the seat tube and dinosaurs on the down tube. I don't generally decorate my bikes that way... since many are collectible to some degree, it wouldn't make sense... but starting with the Fuji I've generally made it a habit to have at least one bike, typically a commuter, decked out this way.

For those who are interested, the frame is the only original part, a basic Fuji "Valite" frame of the 80s, with long wheelbase and a comfortable ride. The brakes are the original brakes off my beloved 1980 Trek, and the derailleurs are a mix of old SunTour hardware (yes, that's the venerable VGT-Luxe on the rear), with SunTour Powerratchet barcon shifters, a personal favorite. Crank is a Sugino VP set up as a triple, and the wheels are an oddball mismatched set with Shimano hubs and I forget what kind of rims. And those bars are "moustache" bars from Nitto of Japan... some folks love them, some folks hate them. Me, I'm a fan, but I can see how others might not care for them. Those fenders are an old set of Bleumels I picked up at the Community Cycling Center in Portland, and the rack is a classic old cheapie from Pletscher of Switzerland. All in all, a fun and eclectic bike.

Saturday, September 1, 2007

My "New" Bike!

Okay, so it's not really new. It's new to me, but it was built almost 35 years ago. It's a 1973 Schwinn Paramount. Those of you who know older bikes, know that this is a good one. Those of you who don't are probably thinking "aren't those old Schwinns tanks???" Well, some of them were, like the Varsity, their low end 10 speed designed to take the abuse of adolescents. The Paramount, on the other hand, was their top of the line model, handbuilt in the USA, using high quality steel tubing (Reynolds 531 double butted), and excellent components. The funny part of it is that I used to look at Schwinn catalogs and dream of owning one of these, way back when this bike was new. There were of course other bikes I dreamed of, but the Paramount was really high on the list. And now I own one. And now I understand why they were so sought after then, and still are now, in some circles. It's a beautiful bike, especially in the full chrome finish that mine has (it was a special order option, I think). And the lugs are classic Nervex lugs, with the lovely curves, very nicely filed and cleanly brazed. And on top of it all, it rides great! I've only done short rides with it, but so far I love it. Smooth, stable, yet it feels light and nimble when I turn. And comfortable! About my only complaints so far are the fact that it has down tube shifters... no biggie, I rode with them for years, it's just I've grown accustomed to, and fond of, bar end shifters... and the gearing, which is set up as "half step plus granny". "What the heck does that mean?", I'm sure some are wondering. Well, with three chain rings up front, and five sprockets in back, the gear ratio differences between the two outer chain rings is basically half as big as the difference between each sprocket. This used to be a fairly common approach, and it was pretty versatile, and worked well with the components of the era. But it's very different from how most modern bikes are set up, and I haven't ridden a half step bike in years. I figure I'll give myself some time to get used to it, and if that doesn't work, I can change it. All of that aside, I'm having a blast riding the bike. And it sure is pretty to look at too.

Saturday, March 17, 2007

Miyata Commuter Revised!

P3170112.JPG
P3170112.JPG,
originally uploaded by frickercycle.
Well, I wanted to post a photo of the Miyata 210 winter commuter I built up, as it is now. After a few weeks trying to love Albatross bars, I gave up and switched to Moustache bars. Much better! It's more comfortable for me, feels faster, and the handling feels more secure and familiar. Maybe the Albatrosses will find a home on another bike someday.

Tuesday, March 6, 2007

Like a whole 'nother bike!

So, after several weeks of riding, I determined that the setup on my "new" 80s Miyata 210 commuter wasn't working for me. I had installed a set of Nitto Albatross handlebars, an upright style of bar that sweeps up and back toward the rider, like an exaggerated variation on the old English 3-speed bars, known as North Road bars. I first heard about them through Rivendell Bicycle Works (www.rivendellbicycles.com), a very cool company headed by former Bridgestone product manager Grant Peterson. Grant espouses a lot of ideas about bicycles and riding, many of which I agree with and some I don't. Regardless, I feel like I and many others have learned and benefited from his thoughts.

It may simply be the specific bike and bar combination, but whatever the reason, I found I just wasn't liking the Albatrosses. I felt like the position was so upright that the slightest headwind would slow me down significantly, and I also felt like I wasn't getting the kind of power to the pedals that I do with some other bars. I could have lived with that for shorter rides (my commute is only 6 miles each way), if I had found them wonderfully relaxing and comfortable to ride. On the contrary, I found myself never really being comfortable on the bike after about 10 minutes or so. I think part of it is that I'm so accustomed to the multiple hand positions of drop handlebars and such, that it's hard for me to live with only one position at the grips. Yes, you can tape up the whole Albatross and gain additional hand positions, and I tried those positions a little while riding, but it still never quite felt right.

The finaly straw was realizing that I just didn't feel as much in control, especially on snow and ice, with these bars. Due to the frame geometry, coupled with the extreme sweepback of the bars, the front end just felt really light and, well, squirrelly (no offense to squirrels!). So off came the Albatrosses, and on went a set of Nitto Moustache bars (another design I learned about from Grant Peterson). I'd used Moustaches on a couple of other bikes, and generally liked them, especially on older road bikes like the Miyata. At first glance, off the bike, they look similar to the Albartross, but they actually have a pronounced forward sweep near the middle, that puts you hands further forward and shifts more weight to the bars and front end, while also stretching out your back more. I don't have a photo of the bike in the new configuration yet, but will soon enough. I immediately felt more at home on the bike once I made this change, and felt I was getting more power, control and comfort all at the same time. Funny how some things work for some people and not for others. Of course, it could just be the particular bike that I tried the Albatrosses on... short of top tube, so even with a really long stem, it tended to keep me more upright than I like. But it's odd that it was actually less comfortable like this, including neck, arm, and wrist aches (minor, but there).