Back in the fall, thanks to this blog, I was contacted by a woman looking for a "mixte" style bicycle. Historically, a mixte was intended as a sort of "unisex" frame that would work for either men or women. The traditional design uses two thin tubes angling from the top of the head tube (where the steering bearings are) all the way to the rear dropouts which hold the rear axle. As I recall, the French first popularized the design, but just about every maker of bikes in the days of the old "ten speed" made some variation on the mixte concept. I've always really admired the design, and heck, here was a person looking for a classic steel bike, so I jumped at the chance to help.
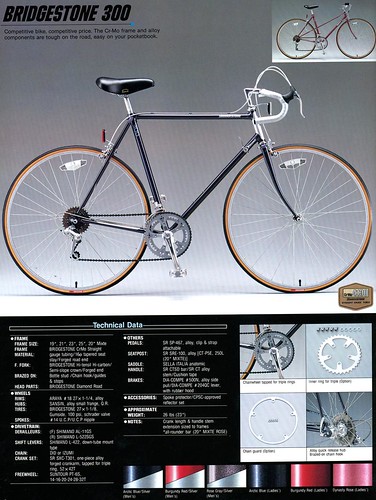 Anyway, in short order, through luck and the help of a friend of mine who apparently spends entirely too much time looking at Craig's List, a mixte was found - a very nice 1986 Bridgestone 300, in a pretty rose color. Then the fun began. The owner brought the bike in for me to look at and assess, and give her some suggestions on fitting and accessorizing. Thus began a process that over the next few months transformed the bike into just the right bike for her... or at least we're well on the way to that!
The first order of business after determining that the bike was in fine mechanical shape, was to try to set the bike up to fit comfortably. In the simplest sense, that wasn't so hard... but "dialing in" the rider's position took a fair amount of time and several different attempts with handlebars. However, that's just the sort of project I enjoy, so it worked out fine, and the owner and I have become friends over the course of this project as well.
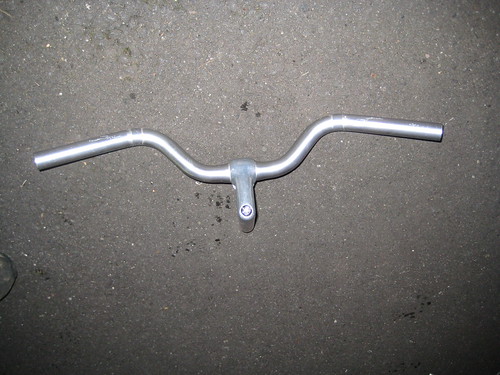 Originally, the bike came with what used to be known as "French style" handlebars, shown in the photo to the right, and in the inset above on the catalog page. It's hard to tell without the bike as a frame of reference (I didn't think to snap a photo before taking them off, dang it!), but they are a narrow, upright style of bar, which sweep forward from the stem, then angle slightly back to the grips. The rider's comments were that they felt narrow and low and too close in. Or at least, that was my interpretation. Sometimes it feels like you're speaking different languages while trying to sort out bike fit and feel!
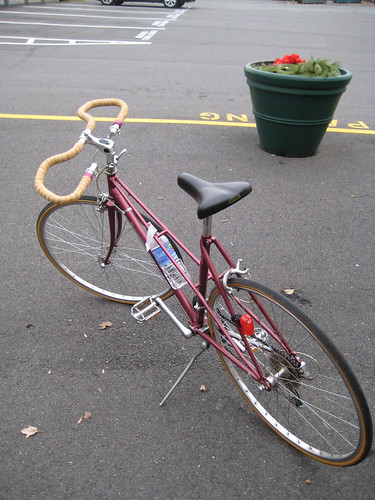 So the first thing we tried was a set of "trekking" or "butterfly" bars. These are a design that you don't see much in the US yet, but they are apparently popular in Europe, for touring as well as commuting. They give you multiple positions for your hands, like traditional road "drop" bars, but tend to put in you a more upright and comfortable position. You can see them wrapped in natural cork tape here on the bike... which in itself led to a pursuit of the perfect color of bar tape for a while! Some mechanics might have found that silly, but having agonized myself over such things, I understood. In this case, there was much anguish over the right color to both complement the honey Brooks saddle (um, yes, another sign of my influence... and no, I don't get a kickback from Brooks!), as well as the rose color of the bike itself. The owner went through a seemingly endless array of options, including several shades of tape (tan, maroon, green...) and even a lovely brown leather sewn-on wrap. Ironically, all the agony over bar wrap ultimately proved irrelevant, as you'll soon see.
Anyway, after riding with these bars for a while, the verdict was that while they were pretty comfortable and versatile, it wasn't a perfect fit, and they just "didn't look right" on the classic steel bike. There's always a balance to be found between form and function in most things, and bikes are no exception. Another person might have decided otherwise, but the owner really wanted a bar more in keeping with the aesthetics of the bike, while offering a comfortable riding position. She's a graphic designer, so the visual makes a big difference, and from my years of working with scenic designers, I knew not to argue.
 Next up, we tried Nitto "moustache" bars, a personal favorite of mine. I like the look and feel of them, and find them really nice for a general purpose, knocking around kind of bike. Not as racy as drop bars, but more hand positions than a straight bar. And they look more in keeping with an older bike, I think. The problem here was they just never really felt comfortable for the rider, despite tweaking the position several times both vertically and horizontally. Honestly, I wasn't that suprised, as I know that moustache bars just don't work for some folk, particularly women. There's just something about the position they put you in that just doesn't agree with some. I should note, by the way, that here is where an "adjustable" stem comes in handy. Unlike more traditional rigid stems, this type is articulated such that you can adjust the angle and thus the reach as well as the height. Not the prettiest stems, but very practical when working out fit issues.
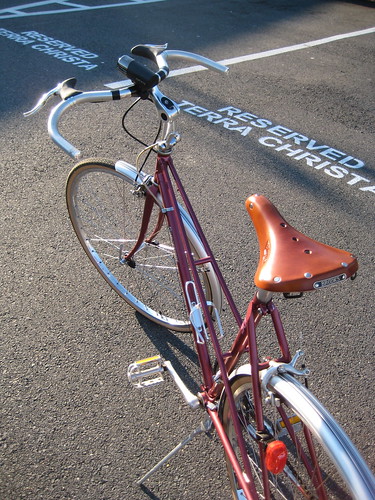
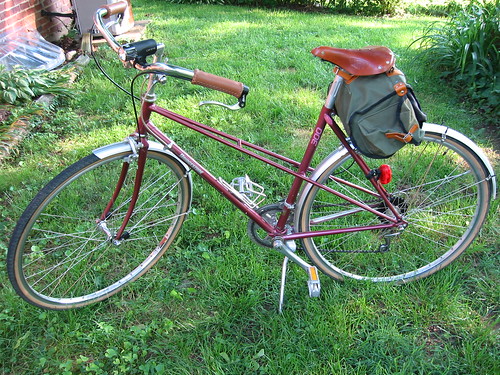
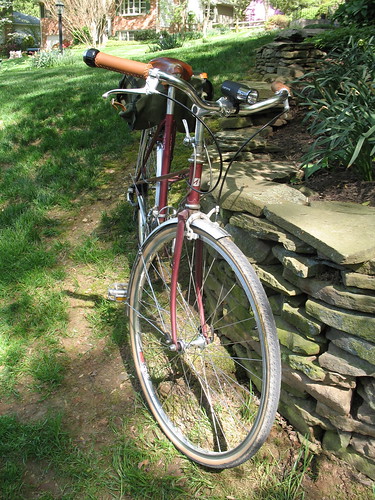 Finally, or at least to date (stay posted!), what we settled on is a traditional "North Road" style of bar, similar to what millions of classic old British three speeds used. In this case, it's a very nice, simple, affordable bar from Wald, one of the few US makers of bike parts that has been around a long, long time. They've been making baskets, bars, stems and other bits and pieces in Kentucky for ages now. And one ride with their model 8095 "touring" bar convinced the owner that these were the best choice so far. Pal Beth, of the bikelovejones blog, will appreciate this, as they are a favorite bar of hers. A little tweaking here and there, and it seems we've hit upon a winner. You can see the bike here in the penultimate setup, with the adjustable stem and original brake levers.
Speaking of brake levers, in an earlier experiment, I let my friend try out my Dahon Hon Solo, which has moustache bars and "reverse" brake levers, which plug into the end of the bars and point forward. She liked those right away, so along with selecting a more attractive, rigid stem based on the setup we had settled on with the adjustable, they completed the package. Well, completed it as far as riding position goes...
You see, there's more to making a bike "yours" than simply position. Based on some of my suggestions, this mixte is taking shape in other ways as well. You have probably noticed by now that in the later photos the bike now sports several features that clearly show my influence... notably the Brooks saddle, Carradice Pendle bag, and SKS fenders. What can I say? I know what I like, what works for me, and I will steer folks that way if I think it's the best choice for them. There are plenty of people that have come to me to ask my advice that I would never dream of putting on a Brooks or suggesting a Carradice, but when someone notices what I have done with my bikes, and asks about it, I know they are open to the idea. A starting point on this whole project was the owner taking a look at my bikes and getting a feel for the style I prefer, and she seemed to really "get" it. And so far, the saddle, bag, and fenders all seem to be working for her. Although she has been eyeing some Velo Orange fenders lately...
But there's more to be done still... with a desire to use the bike for transportation... shopping, errands, commuting... the question of luggage is still being explored. The Pendle bag is a great bag for a recreational day ride, with room for a lunch, patch kit, tools, and a few extra bits of clothes... but it's not really enough to tote groceries home, or a change of clothes for work. For that we're going to be looking into a rack and some bags of some sort, perhaps "grocery panniers" a simplified design of bag that hangs on either side of a rear rack. Or maybe soemthing in a stylish basket? A set of Basil bags, in their fun colors and designs? Hmmmm.... So many choices, so many fun options!
Stay tuned for future developments, and other "makeover" projects as they come along.
There she is, in all her glory!
A few more photos can be seen at:
http://www.flickr.com/photos/43828356@N00/sets/72157618985717292/
6 comments:
The bike looks great. I was wondering... where do you find all these nice accessories - SKS fenders, Brooks saddle, saddle bag.... Does your shop sell them, or do you go on ebay or what? Also, regarding the Brooks saddle - what do you do when it rains? Thanks.
Our shop carries the SKS fenders, and the leather grips, and we can get Brooks saddles from one of our distributors. The saddle bag is harder to come by... I only know a handful of places that have them in the US: www.harriscyclery.com and www.wallbike.com are two. If you are lucky enough to be in Portland, OR, you can also pick up Carradice bags at CityBikes, where pal Beth works.
Really nice bike, and I can't tell you how pleased I am when anyone uses the word "penultimate" correctly! Thanks, too for the "Carradice at CityBikes" tip.
Philip -
Happy to help with the lead on the Carradice bags. And I really appreciate your comment on "penultimate"... I used to be a college professor, and endured any number of horrific manglings of the English language!
Hi, I am in the process of rebuilding one and would appreciate your help on the following:
- Bottom bracket size (is it english 68mm or french thread?)
- seatpost diameter (looking to put an alloy one)
- dropout spacing
Thanks!
CL - It all depends on what model and brand of bike you're looking at, along with the age. Are you working on a similar Bridgestone? This bike has a 68mm English bb, seatpost diameter I don't recall off the top of my head, but your post should be marked, or a shop can measure for you. Dropout spacing is 126mm, which by the mid 80s was pretty well standard on road bikes.
Post a Comment